
Microphones, Recording, and Gain Staging
Different situations call for different microphone setups. Using different types of microphone, placement, and sound staging will greatly affect the final recorded sound. The following information is what I need to consider when recording and using microphones in my project.
Microphone Polar/Pickup Patterns
To start, I want to cover microphone polar patterns or pickup patterns. The shape of a microphone’s polar/pickup pattern determines its sensitivity to incoming sound from a given direction. The different shapes of these patterns can be viewed as a 360° top down cross section diagram with the microphone at its centre. Each pattern can serve a different purpose and include:


Use arrows to naviage
Diagram reference: Williams Bereng. (2018). STUDIO MICROPHONE GUIDE – DIFFERENT TYPES AND THEIR USES. [Online]. Quora. Last Updated: 2018. Available at: https://strangedrums.quora.com/STUDIO-MICROPHONE-GUIDE-DIFFERENT-TYPES-AND-THEIR-USES [Accessed 18 March 2024].
Whilst these graphs give a general idea of what a microphone's polar pattern may look like, a given microphone may be subject to "off-axis colouration" which would mean its frequency response wouldn't be consistent at all angles. This would be most noticeable in higher frequencies when recording large ambient areas.
Microphone Frequency Response Graphs
According to Davida Rochman, "Frequency response defines the range of sound that a microphone can reproduce and how its output varies within that range. The frequency response is the most significant factor in determining the sound signature of a microphone," (Rochman, 2009). This is represented by a frequency response graph and is different depending on the specific model of microphone you use. Below is an example of two frequency response graphs comparing two different microphones.
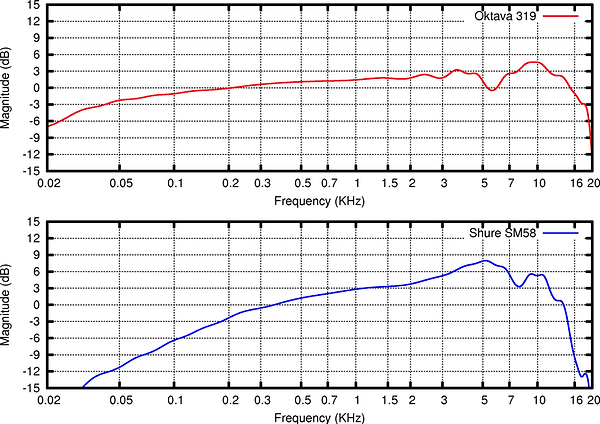
The x axis on the graph represents frequency from 20-20,000 Hz (Hertz), and the y axis represents relative response to the given frequency. For example, a higher magnitude response (measured in dB - Decibels) for a certain frequency would indicate a higher (or louder) output for that given frequency. Theoretically, a microphone with a flat frequency response curve would produce an equal output at all frequencies.
So, in the example above, the the Shure SM58 would be less suitable for recording lower frequencies (bass) than the Oktava 319 due to its output of the bass frequency range being a lot less. Despite this, it is better at covering the mid to treble ranges of 1,000 Hz to 20,000 Hz than the Oktava 319. Knowing the frequency response of a microphone is important when recording as its important to know whether it's suitable for recording your subject. If I wanted to record my bass guitar I could use this data to come to the conclusion that a microphone such as the Shure SM58 would not be suitable for the job as I could lose detail in the lower frequencies (where the tone of a bass guitar is dominant) as its frequency response in that range is relatively low. On the other hand, the Shure SM58 would be very good for vocals as its frequency response suits the frequency range of a singing voice.
Ref: Rochman, D. (2009). Mic Basics: What is Frequency Response?. [Online]. shure.com. Last Updated: 10 August 2017. Available at: https://www.shure.com/en-US/performance-production/louder/mic-basics-frequency-response [Accessed 8 April 2024].
Types of Microphone
The main three types of microphone are dynamic, condenser, and ribbon, but I've also included the shotgun microphone in this section due to its relevancy in sound production for TV and Film.


-
Dynamic Microphones - Most commonly used for vocals, contains a tough, less sensitive induction coil suspended in front of a magnet that moves when hit by the pressure of sound waves, converting this movement into an electric signal.
-
Condenser Microphones - Requires 48V of phantom power to operate. Generally a lot more sensitive and a lot less tough than dynamic microphones but have a wider frequency and dynamic range. They use a sensitive diaphragm which vibrates when the pressure of sound waves hit it and the connected capacitor and wires convert it into a signal.
-
Ribbon Microphones - One of the earliest forms of microphone, it uses a thin strip of metal suspended between the poles of a magnet to convert sound waves into an electric signal. Creates a very accurate sound reproduction with good response on the high ends. Because of shape of the metal strip of the inside of mic, ribbon mics always have a figure 8 polar pattern. It's also important to be aware not so supply phantom power to Ribbon Mics as it could cause irreversible damage.
-
Shotgun Microphones - Shotgun microphones are a unidirectional microphone and are generally used to focus on capturing incoming sound from a particular source or subject. Internally, they work similarly to condenser microphones, but its how they work externally that makes them unique. They have a long tube mounted to the front called an "interference tube" with slots in the side that cause incoming sound from the sides to be greatly reduced in level. The length of the tube determines the "pickup angle" for recording sounds. Sounds recorded within this angle will remain consistent. A smaller tube would have a wider pickup angle whilst a longer tube would have a smaller, more focused pickup angle. Shure's VP89 series has a good diagram displaying this with their VP89S (short) having an angle of 70° and their VP89L (long) having a pickup angle of 30°.

Gain Staging
When using microphones, it is very important to think about gain staging when recording for a project. Gain staging refers to the management of the sensitivity of the signal going into the microphone, and therefore the volume of the microphone's output entering the DAW (in my case, Logic Pro). You don't want the recorded sound to be too loud or too quiet. Increasing the gain of a microphone when recording increases the signal strength, therefore increasing the volume entering the DAW and decreasing the gain does the opposite.
This is best monitored on the output level meters on the tracks of the DAW which have peak meters displaying the volume of each track (the recording microphone should be linked to a specific track). According to Cymatics, "You should be aware that digital and analog systems measure audio differently. In your DAW, gain is measured in terms of dBFS (decibels full scale). And this is why a good rule of thumb to remember is: -18 dBs (roughly) on the analogue domain equals 0 dB on the digital realm." (Cymatics, 2024).
With this information in mind, when recording anything into a DAW, I should adjust the gain and keep an eye on the peak meter of my track. Looking at the meter to the right as an example, the meter should go no higher than the -18 mark. It's also worth noting that most DAWs will indicate if you're going over this in the GUI as the green meter turns to yellow over -18dB (in Logic's case it's closer to -10dB) and eventually turning red at 3db (which would mean its way too high and at this point you might get some distortion even). In my Foley recordings, I can test each object I record in the microphone and adjust my gain as needed as some sound effects will be quieter or louder than others. If I do this preparation properly for each recording, I can ensure a consistent volume of each of my recordings in my project which will help me when balancing the mix during editing for the final product. This, overall will help me achieve a professional sounding final product, which is my aim.
Ref: Cymatics. (2024). What Is Gain Staging & How It Can Improve Your Mix. [Online]. Cymatics. Last Updated: 2024. Available at: https://cymatics.fm/blogs/production/what-is-gain-staging [Accessed 15 April 2024].
